
2.2. Numpy の先進的な機能
著者: Pauli Virtanen
Numpy は Python による科学技術計算ツールスタックの基本で、メモリブロック内のたくさんの要素の効率的な操作を実装するために利用されます。その詳細を知ることで、柔軟性を活かして効率的に利用し、便利に近道することができます。
この節で扱う内容:
Numpy 配列の詳細とその成果物、Tips や工夫。
ユニバーサル関数: どんなもので、なぜあるのか、そして新しく欲しくなったときにどうすればいいか。
他のツールとの統合: Numpy はいくつかの方法で ndarray の中の任意のデータを不要なコピーなしに、ラップすることができます。
最近追加された機能とそれが何をもたらすか: PEP 3118 buffers, generalised ufuncs, ...
事前準備
- Numpy
- Cython
Pillow (Python の画像処理ライブラリ、いくつかの例の中で利用)
ちなみに
この章では numpy は以下のようにしてインポートされます:
>>> import numpy as np
2.2.1. ndarray の生態
2.2.1.1. ndarray とは...
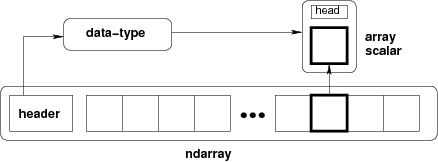
ndarray =
メモリブロック + インデクス方式 + データ型デスクリプタ
生のデータ
要素がどう配置されているか
要素をどう解釈するか
typedef struct PyArrayObject {
        PyObject_HEAD

        /* Block of memory */
        char *data;

        /* Data type descriptor */
        PyArray_Descr *descr;

        /* Indexing scheme */
        int nd;
        npy_intp *dimensions;
        npy_intp *strides;

        /* Other stuff */
        PyObject *base;
        int flags;
        PyObject *weakreflist;
} PyArrayObject;
2.2.1.2. メモリブロック
>>> x = np.array([1, 2, 3], dtype=np.int32)
>>> x.data
<... at ...>
>>> str(x.data)
'\x01\x00\x00\x00\x02\x00\x00\x00\x03\x00\x00\x00'
データのメモリアドレス
>>> x.__array_interface__['data'][0]
64803824
__array_interface__ 全体:
>>> x.__array_interface__
{'data': (35828928, False),
 'descr': [('', '<i4')],
 'shape': (4,),
 'strides': None,
 'typestr': '<i4',
 'version': 3}
注意: 2つの ndarrays は同じメモリを共有しうる:
>>> x = np.array([1, 2, 3, 4])
>>> y = x[:-1]
>>> x[0] = 9
>>> y
array([9, 2, 3])
メモリは ndarray によって所有される必要はありません:
>>> x = b'1234' # The 'b' is for "bytes", necessary in Python 3
x は string (Python 3 では bytes) で、整数配列として表現することもできます:
>>> y = np.frombuffer(x, dtype=np.int8)
>>> y.data
<... at ...>
>>> y.base is x
True

>>> y.flags
  C_CONTIGUOUS : True
  F_CONTIGUOUS : True
  OWNDATA : False
  WRITEABLE : False
  ALIGNED : True
  UPDATEIFCOPY : False
owndata と writeable フラグはメモリブロックの状態を示します。
2.2.1.3. データ型
2.2.1.3.1. デスクリプタ
dtype は配列の1つの要素の性質を記述します:
| type | データの スカラー型 で以下の内のどれか: int8, int16, float64, など (固定サイズ) str, unicode, void (任意サイズ) |
| itemsize | データブロックの サイズ |
| byteorder | バイトオーダー: ビッグエンディアン |
| fields | サブ dtype 構造化されたデータ型 の場合 |
| shape | 配列のシェイプ、 サブ配列 の場合 |
>>> np.dtype(int).type
<type 'numpy.int64'>
>>> np.dtype(int).itemsize
8
>>> np.dtype(int).byteorder
'='
2.2.1.3.2. 例: .wav ファイルの読み込み
.wav ファイルのヘッダ:
| chunk_id | "RIFF" |
| chunk_size | 4バイトの符号無しリトルエンディアン整数 |
| format | "WAVE" |
| fmt_id | "fmt " |
| fmt_size | 4バイトの符号無しリトルエンディアン整数 |
| audio_fmt | 2バイトの符号無しリトルエンディアン整数 |
| num_channels | 2バイトの符号無しリトルエンディアン整数 |
| sample_rate | 4バイトの符号無しリトルエンディアン整数 |
| byte_rate | 4バイトの符号無しリトルエンディアン整数 |
| block_align | 2バイトの符号無しリトルエンディアン整数 |
| bits_per_sample | 2バイトの符号無しリトルエンディアン整数 |
| data_id | "data" |
| data_size | 4バイトの符号無しリトルエンディアン整数 |
生データの(ファイル先頭の)44バイトブロック
data_sizeのバイトの後に実際の音データが続く。
.wav ファイルヘッダを Numpy の 構造化された データ型にしてみると:
>>> wav_header_dtype = np.dtype([
...     ("chunk_id", (bytes, 4)), # flexible-sized scalar type, item size 4
...     ("chunk_size", "<u4"),    # little-endian unsigned 32-bit integer
...     ("format", "S4"),         # 4-byte string
...     ("fmt_id", "S4"),
...     ("fmt_size", "<u4"),
...     ("audio_fmt", "<u2"),     #
...     ("num_channels", "<u2"),  # .. more of the same ...
...     ("sample_rate", "<u4"),   #
...     ("byte_rate", "<u4"),
...     ("block_align", "<u2"),
...     ("bits_per_sample", "<u2"),
...     ("data_id", ("S1", (2, 2))), # sub-array, just for fun!
...     ("data_size", "u4"),
...     #
...     # the sound data itself cannot be represented here:
...     # it does not have a fixed size
...    ])
参考
wavreader.py
>>> wav_header_dtype['format']
dtype('S4')
>>> wav_header_dtype.fields
dict_proxy({'block_align': (dtype('uint16'), 32), 'format': (dtype('S4'), 8), 'data_id': (dtype(('S1', (2, 2))), 36), 'fmt_id': (dtype('S4'), 12), 'byte_rate': (dtype('uint32'), 28), 'chunk_id': (dtype('S4'), 0), 'num_channels': (dtype('uint16'), 22), 'sample_rate': (dtype('uint32'), 24), 'bits_per_sample': (dtype('uint16'), 34), 'chunk_size': (dtype('uint32'), 4), 'fmt_size': (dtype('uint32'), 16), 'data_size': (dtype('uint32'), 40), 'audio_fmt': (dtype('uint16'), 20)})
>>> wav_header_dtype.fields['format']
(dtype('S4'), 8)
最初の要素は
formatの名の通り、構造化されたデータの サブ dtype です。2つめは要素の先頭からのオフセット(バイト単位)です。
練習問題
小演習として offsets を利用し、フィールドにいくつかの値だけを使うことで “sparse” dtype を作成しましょう:
>>> wav_header_dtype = np.dtype(dict(
...   names=['format', 'sample_rate', 'data_id'],
...   offsets=[offset_1, offset_2, offset_3], # counted from start of structure in bytes
...   formats=list of dtypes for each of the fields,
... ))
それを使って、サンプルレートと data_id (サブ配列として) を読み出しましょう。
>>> f = open('data/test.wav', 'r')
>>> wav_header = np.fromfile(f, dtype=wav_header_dtype, count=1)
>>> f.close()
>>> print(wav_header)
[ ('RIFF', 17402L, 'WAVE', 'fmt ', 16L, 1, 1, 16000L, 32000L, 2, 16, [['d', 'a'], ['t', 'a']], 17366L)]
>>> wav_header['sample_rate']
array([16000], dtype=uint32)
サブ配列にアクセスしてみましょう:
>>> wav_header['data_id']
array([[['d', 'a'],
        ['t', 'a']]],
      dtype='|S1')
>>> wav_header.shape
(1,)
>>> wav_header['data_id'].shape
(1, 2, 2)
サブ配列にアクセスするときには、次元が末尾に足されます!
注釈
音データを読み込むには wavfile, audiolab などの既存のモジュールがあります...
2.2.1.3.3. キャストと再解釈/ビュー
キャスト
代入による
配列作成による
算術演算による
など
そして手動で:
.astype(dtype)
データの再解釈
手動で:
.view(dtype)
2.2.1.3.3.1. キャスト
算術によるキャストは、要約すると:
演算対象となる型(値ではなく!)が問題になる
両者を表現するためにより広範で「安全」な型が採用される
いくつかの状況でスカラーを配列にすると失われることがありますl
キャストでは一般的にデータがコピーされます:
>>> x = np.array([1, 2, 3, 4], dtype=np.float)
>>> x
array([ 1.,  2.,  3.,  4.])
>>> y = x.astype(np.int8)
>>> y
array([1, 2, 3, 4], dtype=int8)
>>> y + 1
array([2, 3, 4, 5], dtype=int8)
>>> y + 256
array([257, 258, 259, 260], dtype=int16)
>>> y + 256.0
array([ 257.,  258.,  259.,  260.])
>>> y + np.array([256], dtype=np.int32)
array([257, 258, 259, 260], dtype=int32)
setitem の際のキャスト: 配列の dtype は要素の代入で変化しません:
>>> y[:] = y + 1.5
>>> y
array([2, 3, 4, 5], dtype=int8)
注釈
厳密なルールについては: numpy documentation を参照してください
2.2.1.3.3.2. 再解釈 / ビュー
メモリ上のデータブロック (4バイト)
0x01|| 0x02|| 0x03|| 0x04unit8 が4つ、または
int8 が4つ、または
int16 が2つ、または
int32 が1つ、または
float32 が1つ、または
- ...
どうすれば、これらを別のものに切り替えられるでしょうか?
dtype の切り替え:
>>> x = np.array([1, 2, 3, 4], dtype=np.uint8)
>>> x.dtype = "<i2"
>>> x
array([ 513, 1027], dtype=int16)
>>> 0x0201, 0x0403
(513, 1027)
0x010x02|| 0x030x04注釈
リトルエンディアン: 最下位バイトがメモリの 左 になる
新しいビューを作る
>>> y = x.view("<i4")
>>> y
array([67305985], dtype=int32)
>>> 0x04030201
67305985
0x010x020x030x04
注釈
.view()は ビュー を作り、メモリブロックをコピー(あるいは変更)しませんdtype の変更 (そして配列のシェイプ調整) のみします:
>>> x[1] = 5
>>> y
array([328193], dtype=int32)
>>> y.base is x
True
小演習: データ再解釈
参考
view-colors.py
配列内に RGBA データがあります:
>>> x = np.zeros((10, 10, 4), dtype=np.int8)
>>> x[:, :, 0] = 1
>>> x[:, :, 1] = 2
>>> x[:, :, 2] = 3
>>> x[:, :, 3] = 4
最後の3つの次元は R B G そしてアルファチャネルです。
フィールド r, g, b, a を持つ (10, 10) の構造化された配列を、データコピーなしで、作成するにはどうすればいいでしょうか?:
>>> y = ...

>>> assert (y['r'] == 1).all()
>>> assert (y['g'] == 2).all()
>>> assert (y['b'] == 3).all()
>>> assert (y['a'] == 4).all()
解答
警告
同じメモリ4バイトを持つ別の配列:
>>> y = np.array([[1, 3], [2, 4]], dtype=np.uint8).transpose()
>>> x = y.copy()
>>> x
array([[1, 2],
       [3, 4]], dtype=uint8)
>>> y
array([[1, 2],
       [3, 4]], dtype=uint8)
>>> x.view(np.int16)
array([[ 513],
       [1027]], dtype=int16)
>>> 0x0201, 0x0403
(513, 1027)
>>> y.view(np.int16)
array([[ 769, 1026]], dtype=int16)
何が起きたのでしょう?
...
x[0,1]が実際に示すものが何かを見てみる必要があります
>>> 0x0301, 0x0402
(769, 1026)
2.2.1.4. インデクス方式: ストライド
2.2.1.4.1. 主要な点
質問:
>>> x = np.array([[1, 2, 3],
...               [4, 5, 6],
...               [7, 8, 9]], dtype=np.int8)
>>> str(x.data)
'\x01\x02\x03\x04\x05\x06\x07\x08\t'

At which byte in ``x.data`` does the item ``x[1, 2]`` begin?
答 (in Numpy)
ストライド: 次の要素を見つけるためにジャンプするバイト数
次元ごとに1つのストライド
  >>> x.strides
  (3, 1)
  >>> byte_offset = 3*1 + 1*2   # to find x[1, 2]
  >>> x.flat[byte_offset]
  6
  >>> x[1, 2]
  6

- simple, **flexible**
2.2.1.4.1.1. C の順序と Fortran の順序
>>> x = np.array([[1, 2, 3],
...               [4, 5, 6]], dtype=np.int16, order='C')
>>> x.strides
(6, 2)
>>> str(x.data)
'\x01\x00\x02\x00\x03\x00\x04\x00\x05\x00\x06\x00'
次の列を見つけるために6バイトのジャンプが必要
次の行を見つけるために2バイトのジャンプが必要
>>> y = np.array(x, order='F')
>>> y.strides
(2, 4)
>>> str(y.data)
'\x01\x00\x04\x00\x02\x00\x05\x00\x03\x00\x06\x00'
次の列を見つけるために2バイトのジャンプが必要
次の行を見つけるために4バイトのジャンプが必要
高次元でも同様:
C: 最後の次元が最も速く変化する(=つまりストライドが小さい)
F: 最初の次元が最も速く変化する
\[\begin{split}\mathrm{shape} &= (d_1, d_2, ..., d_n) \\ \mathrm{strides} &= (s_1, s_2, ..., s_n) \\ s_j^C &= d_{j+1} d_{j+2} ... d_{n} \times \mathrm{itemsize} \\ s_j^F &= d_{1} d_{2} ... d_{j-1} \times \mathrm{itemsize}\end{split}\]
注釈
.view() の振る舞いについて理解できるようになりましょう:
>>> y = np.array([[1, 3], [2, 4]], dtype=np.uint8).transpose()
>>> x = y.copy()
転置はデータのメモリレイアウトに影響を与えず、ストライドのみに影響します
>>> x.strides
(2, 1)
>>> y.strides
(1, 2)
>>> str(x.data)
'\x01\x02\x03\x04'
>>> str(y.data)
'\x01\x03\x02\x04'
int16 2つと解釈した場合の結果は異なります
.copy()は (デフォルトの) C での順序で新しい配列を作成します
2.2.1.4.1.2. 整数によるスライス
全て を
shapeやstridesそして、ことによるとdataポインタの調整のみで表現することができます。データのコピーを作りません
>>> x = np.array([1, 2, 3, 4, 5, 6], dtype=np.int32)
>>> y = x[::-1]
>>> y
array([6, 5, 4, 3, 2, 1], dtype=int32)
>>> y.strides
(-4,)

>>> y = x[2:]
>>> y.__array_interface__['data'][0] - x.__array_interface__['data'][0]
8

>>> x = np.zeros((10, 10, 10), dtype=np.float)
>>> x.strides
(800, 80, 8)
>>> x[::2,::3,::4].strides
(1600, 240, 32)
同様に転置はコピーを作りません(単にストライドを交換します):
>>> x = np.zeros((10, 10, 10), dtype=np.float)
>>> x.strides
(800, 80, 8)
>>> x.T.strides
(8, 80, 800)
ただ、全てのリシェイプ操作がストラウドで表現できるわけではありません:
>>> a = np.arange(6, dtype=np.int8).reshape(3, 2)
>>> b = a.T
>>> b.strides
(1, 2)
今のところは順調です。しかし:
>>> str(a.data)
'\x00\x01\x02\x03\x04\x05'
>>> b
array([[0, 2, 4],
       [1, 3, 5]], dtype=int8)
>>> c = b.reshape(3*2)
>>> c
array([0, 2, 4, 1, 3, 5], dtype=int8)
このように、配列 c を1つのストライドと a のメモリブロックで表現することはできません。つまり reshape 演算にはコピーが必要です。
2.2.1.4.2. 例: ストライドで次元を偽装する
ストライドの操作
>>> from numpy.lib.stride_tricks import as_strided
>>> help(as_strided)
as_strided(x, shape=None, strides=None)
   Make an ndarray from the given array with the given shape and strides
警告
as_strided はメモリブロックの境界内におさまっているか確認 しません...
>>> x = np.array([1, 2, 3, 4], dtype=np.int16)
>>> as_strided(x, strides=(2*2, ), shape=(2, ))
array([1, 3], dtype=int16)
>>> x[::2]
array([1, 3], dtype=int16)
参考
stride-fakedims.py
練習問題
array([1, 2, 3, 4], dtype=np.int8)

-> array([[1, 2, 3, 4],
          [1, 2, 3, 4],
          [1, 2, 3, 4]], dtype=np.int8)
as_stridedのみを利用します:Hint: byte_offset = stride[0]*index[0] + stride[1]*index[1] + ...
ネタバレ
2.2.1.4.3. ブロードキャスト
これを使って何か便利なことをしてみましょう:
[1, 2, 3, 4]と[5, 6, 7]の外積
>>> x = np.array([1, 2, 3, 4], dtype=np.int16)
>>> x2 = as_strided(x, strides=(0, 1*2), shape=(3, 4))
>>> x2
array([[1, 2, 3, 4],
       [1, 2, 3, 4],
       [1, 2, 3, 4]], dtype=int16)
>>> y = np.array([5, 6, 7], dtype=np.int16)
>>> y2 = as_strided(y, strides=(1*2, 0), shape=(3, 4))
>>> y2
array([[5, 5, 5, 5],
       [6, 6, 6, 6],
       [7, 7, 7, 7]], dtype=int16)
>>> x2 * y2
array([[ 5, 10, 15, 20],
       [ 6, 12, 18, 24],
       [ 7, 14, 21, 28]], dtype=int16)
... こうするといくらか親しみあるものに見えます ...
>>> x = np.array([1, 2, 3, 4], dtype=np.int16)
>>> y = np.array([5, 6, 7], dtype=np.int16)
>>> x[np.newaxis,:] * y[:,np.newaxis]
array([[ 5, 10, 15, 20],
       [ 6, 12, 18, 24],
       [ 7, 14, 21, 28]], dtype=int16)
内部的に、配列の ブロードキャスト は本当に 0ストライドを利用して実装されています。
2.2.1.4.4. さらなる工夫: 対角要素
参考
stride-diagonals.py
挑戦
行列の対角要素を拾ってみましょう: (C メモリ順序を過程します):
>>> x = np.array([[1, 2, 3],
...               [4, 5, 6],
...               [7, 8, 9]], dtype=np.int32)

>>> x_diag = as_strided(x, shape=(3,), strides=(???,))
まず
[2, 6]の上対角成分を拾ってみましょう。そして、下対角成分はどうなるでしょう?
- (最後2つのヒント: スライスして、ストライドが開始するポインタを動かします
。)
解答
参考
stride-diagonals.py
挑戦
テンソルのトレースを計算する:
>>> x = np.arange(5*5*5*5).reshape(5, 5, 5, 5)
>>> s = 0
>>> for i in range(5):
...    for j in range(5):
...       s += x[j, i, j, i]
ストライドとその結果の
sum()で:>>> y = as_strided(x, shape=(5, 5), strides=(TODO, TODO)) >>> s2 = ... >>> assert s == s2
解答
2.2.1.4.5. CPU キャッシュの効果
メモリレイアウトはパフォーマンスに影響を与えます:
In [1]: x = np.zeros((20000,))

In [2]: y = np.zeros((20000*67,))[::67]

In [3]: x.shape, y.shape
((20000,), (20000,))

In [4]: %timeit x.sum()
100000 loops, best of 3: 0.180 ms per loop

In [5]: %timeit y.sum()
100000 loops, best of 3: 2.34 ms per loop

In [6]: x.strides, y.strides
((8,), (536,))
小さいストライドの方が速い?
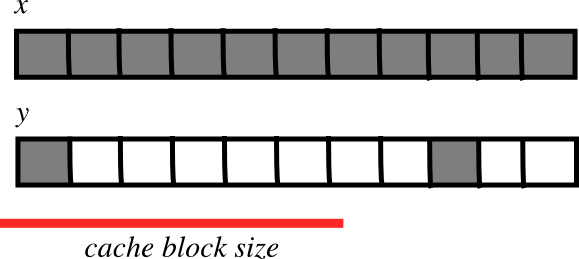
CPU はメインメモリから CPU キャッシュブロック内にデータを引っぱりだします
多くの配列要素が、(小さいストライドで)単一ブロック内に収まって、連続して演算される場合:
\(\Rightarrow\) 必要な転送が少なくなります
- \(\Rightarrow\) faster
参考
numexpr は配列計算でのキャッシュ効果を軽減するよう設計されています。
2.2.1.4.6. 例: インプレースな演算 (買手責任)
しばしば
>>> a -= b
は以下と同じになりません
>>> a -= b.copy()
>>> x = np.array([[1, 2], [3, 4]])
>>> x -= x.transpose()
>>> x
array([[ 0, -1],
       [ 4,  0]])
>>> y = np.array([[1, 2], [3, 4]])
>>> y -= y.T.copy()
>>> y
array([[ 0, -1],
       [ 1,  0]])
2.2.1.5. 解剖により得た知見
メモリブロック: 共有されうる
.base,.dataデータ型デスクリプタ: 構造化されたデータ, サブ配列, バイトオーダー, キャスト, ビュー,
.astype(),.view()ストライドインデクス: ストライド, C/F 順序, 整数によるスライス,
as_strided, ブロードキャスト, ストライドの工夫,diag, CPU キャッシュコヒーレンス
2.2.2. ユニバーサル関数
2.2.2.1. とは何か?
ufunc は配列の全ての要素に対して要素毎の演算を行ないます。
例:
np.add, np.subtract, scipy.special.*, ...
自動でのサポート: ブロードキャスト、キャストなど...
ufunc の作者は要素毎の演算をサポートだけをします、Numpy が残りをケアしてくれます。
要素毎の演算は C で(あるいは Cython などで) 実装する必要があります
2.2.2.1.1. ufunc のパーツ
ユーザにより提供されるもの
void ufunc_loop(void **args, int *dimensions, int *steps, void *data)
{
    /*
     * int8 output = elementwise_function(int8 input_1, int8 input_2)
     *
     * This function must compute the ufunc for many values at once,
     * in the way shown below.
     */
    char *input_1 = (char*)args[0];
    char *input_2 = (char*)args[1];
    char *output = (char*)args[2];
    int i;

    for (i = 0; i < dimensions[0]; ++i) {
        *output = elementwise_function(*input_1, *input_2);
        input_1 += steps[0];
        input_2 += steps[1];
        output += steps[2];
    }
}
以下により作られる Numpy 部分
char types[3]

types[0] = NPY_BYTE   /* type of first input arg */
types[1] = NPY_BYTE   /* type of second input arg */
types[2] = NPY_BYTE   /* type of third input arg */

PyObject *python_ufunc = PyUFunc_FromFuncAndData(
    ufunc_loop,
    NULL,
    types,
    1, /* ntypes */
    2, /* num_inputs */
    1, /* num_outputs */
    identity_element,
    name,
    docstring,
    unused)
ufunc は複数の入出力型の組み合わせをサポートすることもできます。
2.2.2.1.2. 易しくしてみましょう
ufunc_loopはとても汎用的な形式なので Numpy はあらかじめ特化した関数を用意していますPyUfunc_f_ffloat elementwise_func(float input_1)PyUfunc_ff_ffloat elementwise_func(float input_1, float input_2)PyUfunc_d_ddouble elementwise_func(double input_1)PyUfunc_dd_ddouble elementwise_func(double input_1, double input_2)PyUfunc_D_Delementwise_func(npy_cdouble *input, npy_cdouble* output)PyUfunc_DD_Delementwise_func(npy_cdouble *in1, npy_cdouble *in2, npy_cdouble* out)elementwise_funcのみ埋める必要があります- ... except when your elementwise function is not in one of the above forms
2.2.2.2. 演習: ufunc をスクラッチから作る
反復により定義された Mandelbrot フラクタル
ここで \(c = x + i y\) は複素数です。この反復を続けて – \(z\) がどれだけ反復されても有限に留まる場合 \(c\) は Mandelbrot 集合に属します。
以下を計算する
mandel(z0, c)ufunc を作りましょう:z = z0 for k in range(iterations): z = z*z + c
つまり、100回反復するか
z.real**2 + z.imag**2 > 1000するかです。これを利用して c が Mandelbrot 集合に属するか決めてみましょう。関数は単純にするために
PyUFunc_*ヘルパー関数を利用することにしましょう。Cython で書く
参考
mandel.pyx, mandelplot.py
注意: いくつかの既製品の ufunc ループ:
PyUfunc_f_f |
float elementwise_func(float input_1) |
PyUfunc_ff_f |
float elementwise_func(float input_1, float input_2) |
PyUfunc_d_d |
double elementwise_func(double input_1) |
PyUfunc_dd_d |
double elementwise_func(double input_1, double input_2) |
PyUfunc_D_D |
elementwise_func(complex_double *input, complex_double* output) |
PyUfunc_DD_D |
elementwise_func(complex_double *in1, complex_double *in2, complex_double* out) |
型コード:
NPY_BOOL, NPY_BYTE, NPY_UBYTE, NPY_SHORT, NPY_USHORT, NPY_INT, NPY_UINT,
NPY_LONG, NPY_ULONG, NPY_LONGLONG, NPY_ULONGLONG, NPY_FLOAT, NPY_DOUBLE,
NPY_LONGDOUBLE, NPY_CFLOAT, NPY_CDOUBLE, NPY_CLONGDOUBLE, NPY_DATETIME,
NPY_TIMEDELTA, NPY_OBJECT, NPY_STRING, NPY_UNICODE, NPY_VOID
2.2.2.3. 解答: スクラッチから ufunc を作る
# The elementwise function
# ------------------------

cdef void mandel_single_point(double complex *z_in,
                              double complex *c_in,
                              double complex *z_out) nogil:
    #
    # The Mandelbrot iteration
    #

    #
    # Some points of note:
    #
    # - It's *NOT* allowed to call any Python functions here.
    #
    #   The Ufunc loop runs with the Python Global Interpreter Lock released.
    #   Hence, the ``nogil``.
    #
    # - And so all local variables must be declared with ``cdef``
    #
    # - Note also that this function receives *pointers* to the data;
    #   the "traditional" solution to passing complex variables around
    #

    cdef double complex z = z_in[0]
    cdef double complex c = c_in[0]
    cdef int k  # the integer we use in the for loop

    # Straightforward iteration

    for k in range(100):
        z = z*z + c
        if z.real**2 + z.imag**2 > 1000:
            break

    # Return the answer for this point
    z_out[0] = z


# Boilerplate Cython definitions
#
# You don't really need to read this part, it just pulls in
# stuff from the Numpy C headers.
# ----------------------------------------------------------

cdef extern from "numpy/arrayobject.h":
    void import_array()
    ctypedef int npy_intp
    cdef enum NPY_TYPES:
        NPY_CDOUBLE

cdef extern from "numpy/ufuncobject.h":
    void import_ufunc()
    ctypedef void (*PyUFuncGenericFunction)(char**, npy_intp*, npy_intp*, void*)
    object PyUFunc_FromFuncAndData(PyUFuncGenericFunction* func, void** data,
        char* types, int ntypes, int nin, int nout,
        int identity, char* name, char* doc, int c)

    void PyUFunc_DD_D(char**, npy_intp*, npy_intp*, void*)


# Required module initialization
# ------------------------------

import_array()
import_ufunc()


# The actual ufunc declaration
# ----------------------------

cdef PyUFuncGenericFunction loop_func[1]
cdef char input_output_types[3]
cdef void *elementwise_funcs[1]

loop_func[0] = PyUFunc_DD_D

input_output_types[0] = NPY_CDOUBLE
input_output_types[1] = NPY_CDOUBLE
input_output_types[2] = NPY_CDOUBLE

elementwise_funcs[0] = <void*>mandel_single_point

mandel = PyUFunc_FromFuncAndData(
    loop_func,
    elementwise_funcs,
    input_output_types,
    1, # number of supported input types
    2, # number of input args
    1, # number of output args
    0, # `identity` element, never mind this
    "mandel", # function name
    "mandel(z, c) -> computes iterated z*z + c", # docstring
    0 # unused
    )
"""
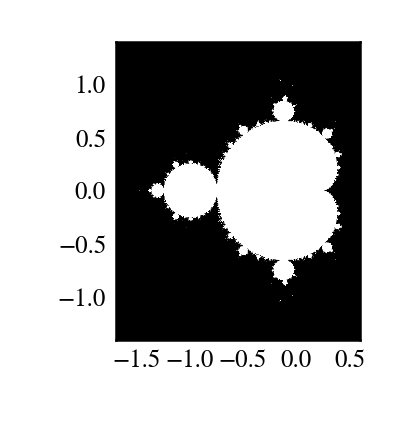
Plot Mandelbrot
================
Plot the Mandelbrot ensemble.
"""
import numpy as np
import mandel
x = np.linspace(-1.7, 0.6, 1000)
y = np.linspace(-1.4, 1.4, 1000)
c = x[None,:] + 1j*y[:,None]
z = mandel.mandel(c, c)
import matplotlib.pyplot as plt
plt.imshow(abs(z)**2 < 1000, extent=[-1.7, 0.6, -1.4, 1.4])
plt.gray()
plt.show()
いくつかの入力型を許容する
例として単精度と倍精度の両方をサポートする場合
cdef void mandel_single_point(double complex *z_in,
                              double complex *c_in,
                              double complex *z_out) nogil:
   ...

cdef void mandel_single_point_singleprec(float complex *z_in,
                                         float complex *c_in,
                                         float complex *z_out) nogil:
   ...

cdef PyUFuncGenericFunction loop_funcs[2]
cdef char input_output_types[3*2]
cdef void *elementwise_funcs[1*2]

loop_funcs[0] = PyUFunc_DD_D
input_output_types[0] = NPY_CDOUBLE
input_output_types[1] = NPY_CDOUBLE
input_output_types[2] = NPY_CDOUBLE
elementwise_funcs[0] = <void*>mandel_single_point

loop_funcs[1] = PyUFunc_FF_F
input_output_types[3] = NPY_CFLOAT
input_output_types[4] = NPY_CFLOAT
input_output_types[5] = NPY_CFLOAT
elementwise_funcs[1] = <void*>mandel_single_point_singleprec

mandel = PyUFunc_FromFuncAndData(
    loop_func,
    elementwise_funcs,
    input_output_types,
    2, # number of supported input types   <----------------
    2, # number of input args
    1, # number of output args
    0, # `identity` element, never mind this
    "mandel", # function name
    "mandel(z, c) -> computes iterated z*z + c", # docstring
    0 # unused
    )
2.2.2.4. 一般化された ufunc
ufunc
output = elementwise_function(input)
outputとinputの両者は単一の配列要素のみ。
一般化された ufunc
outputとinputが固定長次元の配列でもいい例として、行列のトレース (対角要素の和):
input shape = (n, n)
output shape = ()      i.e.  scalar

(n, n) -> ()
行列積:
input_1 shape = (m, n)
input_2 shape = (n, p)
output shape  = (m, p)

(m, n), (n, p) -> (m, p)
これは一般化された ufunc の “signature” と呼ばれます
g-ufunc が動作する次元は “core dimensions”
Numpy での状況
g-ufunc は Numpy では十分といえますが...
PyUFunc_FromFuncAndDataAndSignatureで新しいものが作れます...が、g-ufunc は今のところテスト無しで公開することはできません、今のところは
>>> import numpy.core.umath_tests as ut
>>> ut.matrix_multiply.signature
'(m,n),(n,p)->(m,p)'
>>> x = np.ones((10, 2, 4))
>>> y = np.ones((10, 4, 5))
>>> ut.matrix_multiply(x, y).shape
(10, 2, 5)
最後の2つの次元が core dimensions で signature 毎に変更されます
それ以外の場合は、g-ufunc は「要素毎」に演算します
行列の乗算をこの方法でやると、小さな行列を一度に演算する必要がある場合に便利です。
一般化された ufunc のループ
行列の乗算 (m,n),(n,p) -> (m,p)
void gufunc_loop(void **args, int *dimensions, int *steps, void *data)
{
    char *input_1 = (char*)args[0];  /* these are as previously */
    char *input_2 = (char*)args[1];
    char *output = (char*)args[2];

    int input_1_stride_m = steps[3];  /* strides for the core dimensions */
    int input_1_stride_n = steps[4];  /* are added after the non-core */
    int input_2_strides_n = steps[5]; /* steps */
    int input_2_strides_p = steps[6];
    int output_strides_n = steps[7];
    int output_strides_p = steps[8];

    int m = dimension[1]; /* core dimensions are added after */
    int n = dimension[2]; /* the main dimension; order as in */
    int p = dimension[3]; /* signature */

    int i;

    for (i = 0; i < dimensions[0]; ++i) {
        matmul_for_strided_matrices(input_1, input_2, output,
                                    strides for each array...);

        input_1 += steps[0];
        input_2 += steps[1];
        output += steps[2];
    }
}
2.2.3. 相互運用のための機能
2.2.3.1. 多次元の型つきデータを共有する
以下のことがだと仮定します
(多次元の) バイナリデータを扱うのではなく、ライブラリを書く、
Numpy または他のライブラリなどでデータを簡単に操作できるようにしたい
... が、Numpy に依存として持ち たくない。
今のところ 3つの解決策があります:
「古い」buffer インターフェース
array インターフェース
「新しい」buffer インターフェース (PEP 3118)
2.2.3.2. 古い buffer プロトコル
1次元 buffer のみ
データ型情報なし
Cレベルのインターフェース; 型オブジェクト内の
PyBufferProcs tp_as_bufferですが、Python 内に統合されています (例えば、文字列はこれをサポートします。)
Pillow (Python 画像ライブラリ) を利用した小演習:
参考
pilbuffer.py
>>> from PIL import Image
>>> data = np.zeros((200, 200, 4), dtype=np.int8)
>>> data[:, :] = [255, 0, 0, 255] # Red
>>> # In PIL, RGBA images consist of 32-bit integers whose bytes are [RR,GG,BB,AA]
>>> data = data.view(np.int32).squeeze()
>>> img = Image.frombuffer("RGBA", (200, 200), data, "raw", "RGBA", 0, 1)
>>> img.save('test.png')
質問:
dataを変更してimgを再度保存すると、何が起きるか確認してましょう。
2.2.3.3. 古い buffer プロトコル
"""
From buffer
============

Show how to exchange data between numpy and a library that only knows
the buffer interface.
"""

import numpy as np
import Image

# Let's make a sample image, RGBA format

x = np.zeros((200, 200, 4), dtype=np.int8)

x[:,:,0] = 254 # red
x[:,:,3] = 255 # opaque

data = x.view(np.int32) # Check that you understand why this is OK!

img = Image.frombuffer("RGBA", (200, 200), data)
img.save('test.png')

#
# Modify the original data, and save again.
#
# It turns out that PIL, which knows next to nothing about Numpy,
# happily shares the same data.
#

x[:,:,1] = 254
img.save('test2.png')


2.2.3.4. Array インターフェースプロトコル
多次元のバッファ
データ型情報が存在する
Numpy 特有の方法: ゆるやかに非推奨になっています (完全にではありませんが)
いづれにせよ Python には統合されません。
>>> x = np.array([[1, 2], [3, 4]])
>>> x.__array_interface__
{'data': (171694552, False),      # memory address of data, is readonly?
 'descr': [('', '<i4')],          # data type descriptor
 'typestr': '<i4',                # same, in another form
 'strides': None,                 # strides; or None if in C-order
 'shape': (2, 2),
 'version': 3,
}
- ::
>>> from PIL import Image
>>> img = Image.open('data/test.png')
>>> img.__array_interface__
{'data': ...,
 'shape': (200, 200, 4),
 'typestr': '|u1'}
>>> x = np.asarray(img)
>>> x.shape
(200, 200, 4)
注釈
より C フレンドリーな array インターフェースの変種も定義されています。
2.2.4. 配列の競合: chararray, maskedarray, matrix
2.2.4.1. chararray: 文字列演算のベクトル化
>>> x = np.array(['a', '  bbb', '  ccc']).view(np.chararray)
>>> x.lstrip(' ')
chararray(['a', 'bbb', 'ccc'],
      dtype='...')
>>> x.upper()
chararray(['A', '  BBB', '  CCC'],
      dtype='...')
注釈
ここでの .view() は別の意味を持ちます: 特殊化した ndarray 派生クラスのインスタンスの ndarray を作成できます
2.2.4.2. masked_array 欠損データ
マスクされた配列は欠損値や無効な内容を含む場合があります。
例えば、4つめの値が無効な配列を考えてみましょう:
>>> x = np.array([1, 2, 3, -99, 5])
これを記述するために、マスクされた配列を利用します:
>>> mx = np.ma.masked_array(x, mask=[0, 0, 0, 1, 0])
>>> mx
masked_array(data = [1 2 3 -- 5],
             mask = [False False False  True False],
       fill_value = 999999)
マスクされた、という意味はマスクしたデータを無視することからきています。
>>> mx.mean()
2.75
>>> np.mean(mx)
2.75
警告
全ての Numpy 関数がマスクを扱えるわけではありません、例えば np.dot など、なので返ってくる型を確認しましょう。
masked_array は元の配列の ビュー を返します:
>>> mx[1] = 9
>>> x
array([  1,   9,   3, -99,   5])
2.2.4.2.1. マスク
マスクを代入で変更することもできます:
>>> mx[1] = np.ma.masked
>>> mx
masked_array(data = [1 -- 3 -- 5],
             mask = [False  True False  True False],
       fill_value = 999999)
マスクは代入により消せます:
>>> mx[1] = 9
>>> mx
masked_array(data = [1 9 3 -- 5],
             mask = [False False False  True False],
       fill_value = 999999)
マスクを直接利用することもできます:
>>> mx.mask
array([False, False, False,  True, False], dtype=bool)
マスクされた内容は値を与えて埋めることで、通常の配列に戻すこともできます:
>>> x2 = mx.filled(-1)
>>> x2
array([ 1,  9,  3, -1,  5])
マスクも消すことができます:
>>> mx.mask = np.ma.nomask
>>> mx
masked_array(data = [1 9 3 -99 5],
             mask = [False False False False False],
       fill_value = 999999)
2.2.4.2.2. 領域を配慮する関数
masked array パッケージには領域を配慮する関数も含まれています:
>>> np.ma.log(np.array([1, 2, -1, -2, 3, -5]))
masked_array(data = [0.0 0.6931471805599453 -- -- 1.0986122886681098 --],
             mask = [False False  True  True False  True],
       fill_value = 1e+20)
注釈
欠損データが含まれる配列を扱うための効率的で自然なサポートが Numpy 1.7 で進められています。乞うご期待!
例: 統計でマスクを利用する
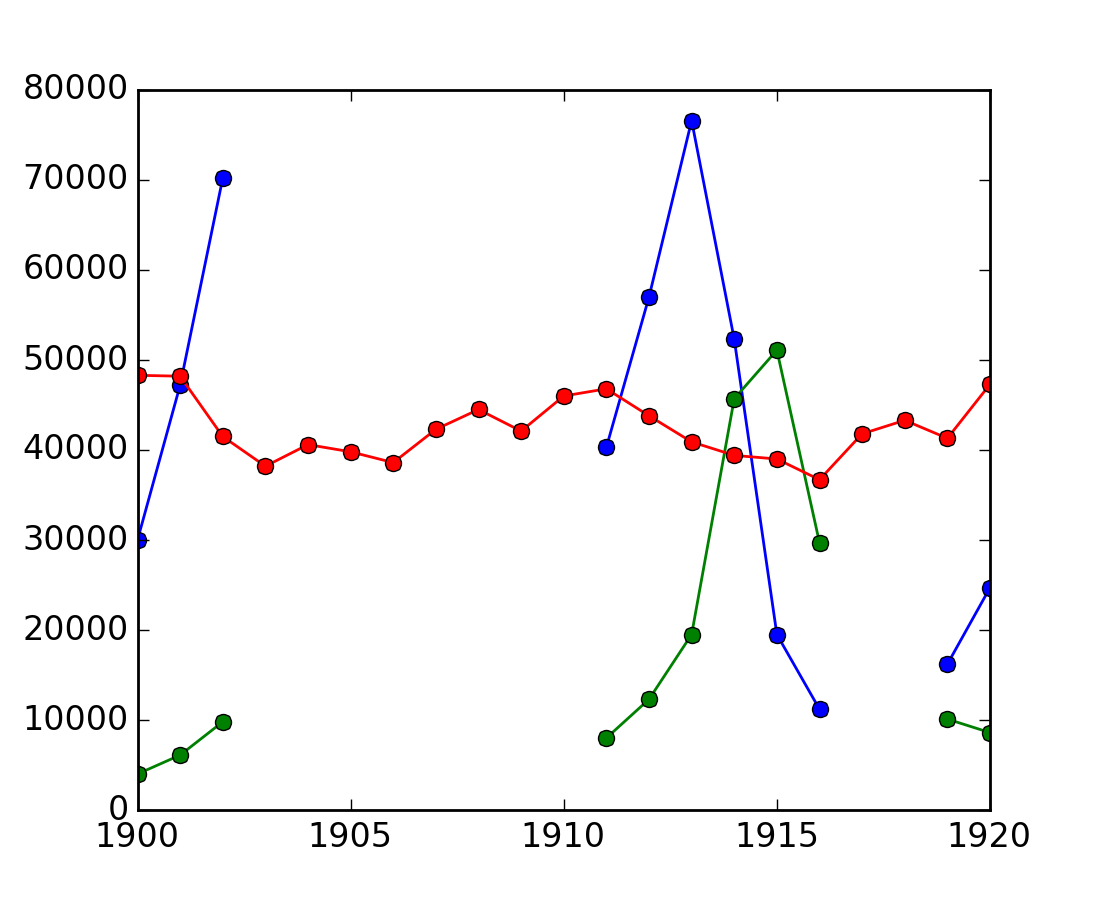
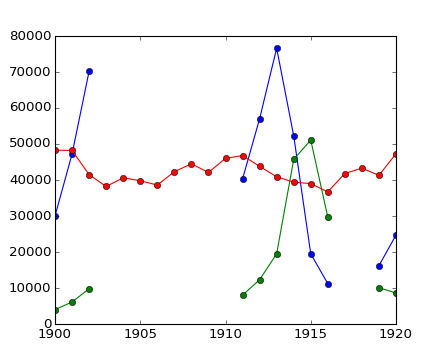
カナダのレンジャーは 1903年-1910年と1917年-1918年の間で野ウサギと山猫の計数するときに気をとられて、間違った数字を出しました。(しかし、ニンジン農家は注意深いままでした。)個体数の時間変化を、無効な数値を除いて計算します。
>>> data = np.loadtxt('data/populations.txt')
>>> populations = np.ma.masked_array(data[:,1:])
>>> year = data[:, 0]

>>> bad_years = (((year >= 1903) & (year <= 1910))
...            | ((year >= 1917) & (year <= 1918)))
>>> # '&' means 'and' and '|' means 'or'
>>> populations[bad_years, 0] = np.ma.masked
>>> populations[bad_years, 1] = np.ma.masked

>>> populations.mean(axis=0)
masked_array(data = [40472.72727272727 18627.272727272728 42400.0],
             mask = [False False False],
       fill_value = 1e+20)

>>> populations.std(axis=0)
masked_array(data = [21087.656489006717 15625.799814240254 3322.5062255844787],
             mask = [False False False],
       fill_value = 1e+20)
Matplotlib はマスクされた配列のことを知っていることに注意をしておきましょう:
>>> plt.plot(year, populations, 'o-')
[<matplotlib.lines.Line2D object at ...>, ...]
2.2.4.3. recarray: 純粋に便利
>>> arr = np.array([('a', 1), ('b', 2)], dtype=[('x', 'S1'), ('y', int)])
>>> arr2 = arr.view(np.recarray)
>>> arr2.x
chararray(['a', 'b'],
      dtype='|S1')
>>> arr2.y
array([1, 2])
2.2.4.4. matrix: は便利なの?
常に2次元
*は行列積で、要素毎ではない
>>> np.matrix([[1, 0], [0, 1]]) * np.matrix([[1, 2], [3, 4]])
matrix([[1, 2],
        [3, 4]])
2.2.5. まとめ
ndarray の解剖: data, dtype, strides.
ユニバーサル関数: 要素毎の演算と新しいものをどうやって作るか
ndarray の派生クラス
他のツールとの統合のための多様な buffer インターフェース
最近追加されたもの: PEP 3118 や一般化された ufunc
2.2.6. Numpy/Scipy に貢献するには
このチュートリアルを見ましょう: http://www.euroscipy.org/talk/882
2.2.6.1. なぜ
「これバグ?」
「なんでこういう動きをするのか理解できない」
「こんなすごいコードがあるんだけど、どう?」
「支援したい!何かできることある?」
2.2.6.2. バグレポート
バグトラッカー(ここ を使うのがいい)
- http://projects.scipy.org/numpy
- http://projects.scipy.org/scipy
“Register” リンクをクリックして、アカウントを取得しましょう
メーリングリスト (scipy.org/Mailing_Lists)
確実にバグかわからない場合に
1週間くらい返信がない? バグチケットを提出しましょう。
2.2.6.2.1. 良いバグレポート
Title: numpy.random.permutations fails for non-integer arguments

I'm trying to generate random permutations, using numpy.random.permutations

When calling numpy.random.permutation with non-integer arguments
it fails with a cryptic error message::

    >>> np.random.permutation(12)
    array([ 6, 11,  4, 10,  2,  8,  1,  7,  9,  3,  0,  5])
    >>> np.random.permutation(12.)
    Traceback (most recent call last):
      File "<stdin>", line 1, in <module>
      File "mtrand.pyx", line 3311, in mtrand.RandomState.permutation
      File "mtrand.pyx", line 3254, in mtrand.RandomState.shuffle
    TypeError: len() of unsized object

This also happens with long arguments, and so
np.random.permutation(X.shape[0]) where X is an array fails on 64
bit windows (where shape is a tuple of longs).

It would be great if it could cast to integer or at least raise a
proper error for non-integer types.

I'm using Numpy 1.4.1, built from the official tarball, on Windows
64 with Visual studio 2008, on Python.org 64-bit Python.
何をしたいかを明らかにしましょう
バグを再現する小さなコードスニペット (可能であれば)
実際に何が起きているのか
あなたが期待すること
プラットフォーム (Windows / Linux / OSX, 32/64ビット, x86/PPC, ...)
Numpy/Scipy のバージョン
>>> print(np.__version__)
1...
以下の結果が期待通りか確認しましょう
>>> print(np.__file__)
/...
もし、古いあるいは壊れた Numpy がインストールされている場所の場合。
もし、よくわからない場合はインストールされた Numpy を削除して再インストールするなど...
2.2.6.3. ドキュメントへの貢献
ドキュメントエディタ
登録
アカウントの登録
scipy-devメーリングリストへの登録 (購読のみ)メーリングリストの問題: メール受信
しかし: メール配送を切ることもできます
下部の “change your subscription options”
scipy-devメーリングリストにメールを送り、アクティベーションをお願いします:To: scipy-dev@scipy.org Hi, I'd like to edit Numpy/Scipy docstrings. My account is XXXXX Cheers, N. N.
スタイルガイドを確認します:
- http://docs.scipy.org/doc/numpy/
恐れず; 小さい修正なら、単に修正するだけです
編集する
ソースを編集したり、(バグに対する)パッチを送る
メーリングリストで訴えかける
2.2.6.4. 機能の貢献
やるべきことか判断しかねる場合は、メーリングリストで尋ねてみましょう
パッチを書いて、enhancement チケットをバグトラッカーに追加します
あるいは、機能を実装する Git ブランチを作成し、加えて enhancement ticket を追加します。
特に大規模だったり、内部をかなり変更するような追加の場合は
- http://projects.scipy.org/numpy/wiki/GitMirror
- http://www.spheredev.org/wiki/Git_for_the_lazy
# Clone numpy repository
git clone --origin svn http://projects.scipy.org/git/numpy.git numpy
cd numpy

# Create a feature branch
git checkout -b name-of-my-feature-branch  svn/trunk

<edit stuff>

git commit -a
https://github.com (または他のものでも) でアカウントを作成する
Github で新しいリポジトリを作成する
github にやった内容を push する
git remote add github git@github:USERNAME/REPOSITORYNAME.git
git push github name-of-my-feature-branch
2.2.6.5. 一般的な支援をするには
バグ修正は常に歓迎します!
一番あなたをいらいらさせるもの
トラッカーを眺めてみましょう
ドキュメントでの貢献
API ドキュメント: ドキュメンテーション文字列の改善
いくつかの Scipy モジュールについて十分な知識がありますか?
ユーザガイド
ゆくゆくはやっていく必要があります。
考えてみますか? 目次から考えてみましょう
コミュニケーションチャンネルでの質問
numpy-discussionメーリングリストscipy-devメーリングリスト